Thursday, June 13, 2013

Earrings Organization using a Hanging Storage Bag!

Tips on organizing your earrings?  
Tons of earrings in your jewellery box?
 
Not anymore!
 

 Use a hanging storage organizer  you can pick up at your local Dollar Store or thrift store!
The dividers are small enough for a pair of earrings with see through windows.
It takes up so little space, hang it behind your bedroom door, closet door or closet hanger rod!

DIY Grunge Candles!


Have you ever tried your hand at making you own grunge candles! Super easy and and super fun!

They are so simple to make with minimal cost!

Supplies:
Candle tapers (I used Dollar Store utility candles)
Bulk votives ( I used some votives I picked up at the local thrift store)
Sauce pan
2 Tin foil pans
Narrow container to hold wax for dipping
Stainless steel bowl to use for double broiler
Assorted spices ( I used cinnamon and all spice for mine)
Flipper or wooden spoon
Wax paper
{Im sure there are many variations of this method online, tried, tested and true. This is the method that works best for me with the space to work with and the cost involved.}
Step 1
Cut up your votives using a knife. I used a bread knife so I had a blade that was longer and with height. Choose a cutting board that you won't need later. The smaller the chunks, the better as it speeds up the melt time in the double broiler.

Step 2
Put together a double broiler using a small sauce pan and a small stainless steel bowl. Fill your sauce pan half full and your stainless steel bowl on top. Place a few pieces of chunk wax in the bowl. Bring your water to a med boil. As the water heats, your stainless steel bowl will as well, always use caution ! :) Be sure to leave enought wax chunks aside for dipping your tapers later.

Step 3
Once your wax has melted to liquid pour into your tin foil pan. {The image below shows an old cake pan} You need to fill it up about a 1/4" high and allow it to begin to set. As the top layer of the wax starts to form a seal, begin breaing down the wax and moving it around SLOWLY with your wooden spoon or flipper, to avoid being splashed by wax. As the wax hardens, it begins to crumble and form into the consistency of an oatmeal/apple crumble top( for camparision)....Hungry yet?
The more you move it around the harder it gets. Use the end of your flipper to break down the crumbles and repeat the process until you get a consistency like this! The crumble will be used after dipping to create the grunge texture on the outside of the tapers.


Step 4

Melt the rest of your wax chunks the same way in Step 2, This wax will be for your taper dipping.


Step 5
Once the wax has melted completely, pour into a high and narrow container to be ready for dipping.

Step 6
Dip your tapers into the wax until you reach the wick.


Step 7
Roll the taper in your spices


Step 8
Roll the dipper taper into the crumble


Step 9
Re-dip{is that even a word??} your taper and repeat the process of Step 6-8 until you have achieved the look of grunge candles you are looking to have.

Step 10
Dip one last time to seal the candle
Once you have finished, place them on wax paper to set. I like to wrap my finished grunge candles first in wax paper and gently squeeze the help the wax and crumble to set.
Set them on wax paper to cool and set completely.

Tuesday, June 11, 2013

Dresser sanded!

...ah! Progressing slow but sure!
Last weekend I took part in the local Relay For Life, so I am finally getting back into the swing of things!
Sanding the dresser was so easy and quick to complete.
There was not much of an old stain to sand off.
A few minor bumps of wear and tear of who knows what, stuck on it. Other than that it was easy.
I love the detail of the old key locks on each drawer!
Unfortunately, whoever had it last, cut some width off of the top side. One end has a nice curve.
The other side is straight.
Hubs figures they cut it to fit against a wall.
I don't have a theory as to why it was a cut.
Either way, I think it gives the dresser character and helps to tell a story about it.
I got it moved into the livingroom and have decided to play it between my livingroom window and patio door.
Perfect spot for the size of it!
The next question is, paint it?
Stain it?
All three drawers left in, two drawers taken out?
What do you think?

Monday, June 10, 2013

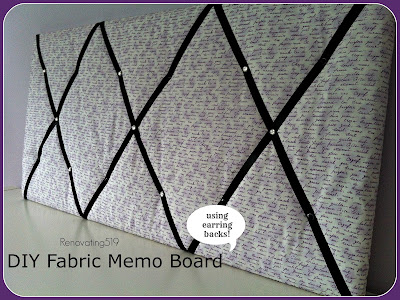
DIY Fabric Memo Board-Keeping tacks in place

Fabric memo boards seem to be all the rage throughout blogland of DIY and home decor!
I am half through the re-do of my oldest daughter's bedroom.
She needed an area to display her favourite little things.
Picture of her bestest
Movie ticket stub.
Photo booth selfies

You know what kind of stuff I'm referring too.
We were all there at one time.
Oh to be 25 years younger again
I put together one she could use that co-ordinated with the colours of her new bedroom re-do!

It was so easy to complete! The great thing about a memo board, other than the obvious, is it serves as a good wall filler. If you are working with a large bare wall and looking to fill it, a fabric memo board is the way to go!
I was able to find a large wrapped canvas board from Michaels Craft Store. They had a huge selection to choose from!
Picking out the fabric was a bit of struggle since my daughter wanted writing in french and in purple. Yah. Get right on that! It took me awhile and a few roads trips but I found some!

Wrapping the board with batting and fabric was pretty quick, and a few staples of it along with black satin ribbon, I was ready for the tacks..... Tacks, you say.

Yeah.
I never even considered how to assemble tacks to keep the ribbon in place.
On goes the DIY thinking cap and this is what I came up with!

Earring backs!
Who wouda thunk it.
The earrings backs fit p-e-r-f-e-c-t-l-y on the back of the tacks.
Complete fluke I'm sure but it all worked out!
 
Linking up to:
 
Hope Studios
Ladybug Blessings
SugarBee Crafts
My Uncommon Slice Of Suburbia
A Bowl Full Of Lemons
Jason and Ashley-Tell me Tuesday
Romance on a Dime
Elizabeth and Co
Not Just  A Housewife
Funky Polkadot Giraffe
New Nostalgia
Homework
A to Zebra Celebrations
If Its Not Baroque
Cupcakes and Crinoline